만약 해당 이야기가 유용하다고 생각되면 왼쪽에 50개의 박수를 주세요.
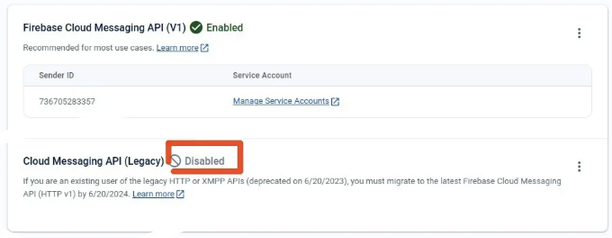
최근 Firebase Messages가 HTTP V1으로 이주되었습니다. Flutter 콘솔에서는 다음과 같이 보입니다.
본 문서에서는 새 API로 이주하는 과정을 설명하겠습니다.
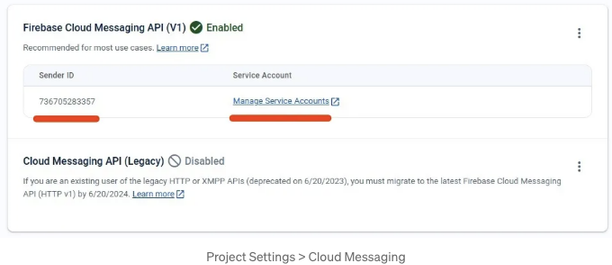
단계 1. 발신자 ID 수집하기
프로젝트 설정에서 클라우드 메시징으로 이동하여 발신자 ID를 복사하고, 나중에 사용할 겁니다.
페이지로 이동: 이 링크
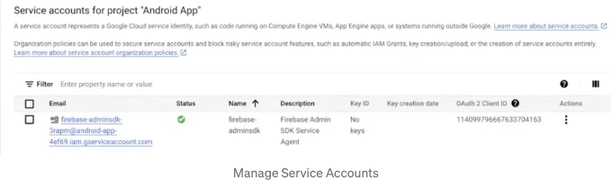
단계 2. Firebase Messaging 클라이언트용 키 수집
- Firebase 콘솔에서 발신자 ID 옆의
Manage Service Accounts버튼을 클릭합니다. 이 버튼을 클릭하면 https://console.cloud.google.com/iam-admin/serviceaccounts로 이동됩니다.
페이지는 다음과 같이 보여야 합니다:
- 어카운트를 클릭하고 'KEYS' 탭을 선택한 후 키를 추가하세요. 그러면 컴퓨터로 키가 담긴 JSON 파일이 다운로드됩니다.
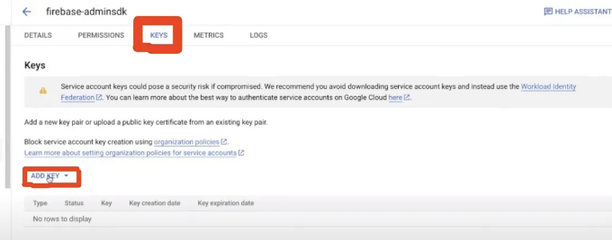
이를 리포지토리에 복사하여 붙여넣기하세요 (이 예시에서는 'data/your-key-from-cloud-console.json'에). pubspec.yaml에 에셋 경로를 추가하는 것을 잊지 마세요.
단계 3. 구글 API Auth 라이브러리 설치
flutter pub add googleapis_auth
단계 4. 코드
기존의 HTTP 요청은 다음과 같았습니다:
// 더 이상 유효하지 않은 코드:

http.post(
  Uri.parse('https://fcm.googleapis.com/fcm/send'),
  headers: {
    'Content-Type': 'application/json',
    'Authorization': 'key=$fcmServerToken',
  },
  body: body,
)
구글 API 인증 라이브러리를 사용해야 하는 새로운 유효한 코드입니다.
import 'package:googleapis_auth/auth_io.dart' as auth;
import 'dart:convert';
import 'package:flutter/services.dart';
import 'dart:developer' as devtools show log;

Future<bool> sendPushMessage({
  required String recipientToken,
  required String title,
  required String body,
}) async {
  final jsonCredentials = await rootBundle
      .loadString('data/your-key-from-cloud-console.json');
  final creds = auth.ServiceAccountCredentials.fromJson(jsonCredentials);

  final client = await auth.clientViaServiceAccount(
    creds,
    ['https://www.googleapis.com/auth/cloud-platform'],
  );

  final notificationData = {
    'message': {
      'token': recipientToken,
      'notification': {'title': title, 'body': body}
    },
  };

  const String senderId = '736705283357';
  final response = await client.post(
    Uri.parse('https://fcm.googleapis.com/v1/projects/$senderId/messages:send'),
    headers: {
      'content-type': 'application/json',
    },
    body: jsonEncode(notificationData),
  );

  client.close();
  if (response.statusCode == 200) {
    return true; // Success!
  }

  devtools.log(
      'Notification Sending Error Response status: ${response.statusCode}');
  devtools.log('Notification Response body: ${response.body}');
  return false;
}
감사합니다! 이 스토리가 유용하다면 왼쪽에 50개의 박수를 남겨주세요.