플러터를 사용한 심플한 룩의 날씨 앱 (소스 코드 제공 가능)
코딩 피로를 극복하기 위해 다양한 기술과 분야를 탐험한 후, 2.5개월 만에 코딩으로 돌아오기로 결정했습니다. 제 목표는 간단하지만 동시에 멋지게 보이는 것을 만드는 것이었습니다. 그래서 무엇을 만들었을까요? 날씨 앱입니다. 알아요, 기본적인 것 같긴 하지만, 제 오프닝을 할 수 있는 무언가를 만들어야 했고 그래서 날씨 앱을 만들기로 했습니다. 쉽고, 동시에 유용한 것을 만든 만족감을 주거든요.
인도의 온도가 50도 이상으로 치솟고 있어 모든 이들의 눈은 뉴스 채널과 날씨 앱에 집중되어 있어 앱을 만드는 것이 완벽한 시기라고 생각했습니다. 더 좋은 디자인을 위해 더 많이 나아갔으며, 색상은 더욱 간소하고 단어는 더욱 줄이기로 했습니다. 그래서 Figma를 열어 (몇 달 만에), UI를 디자인하기 시작했고, 어떻게든 꽤 괜찮아 보였습니다.
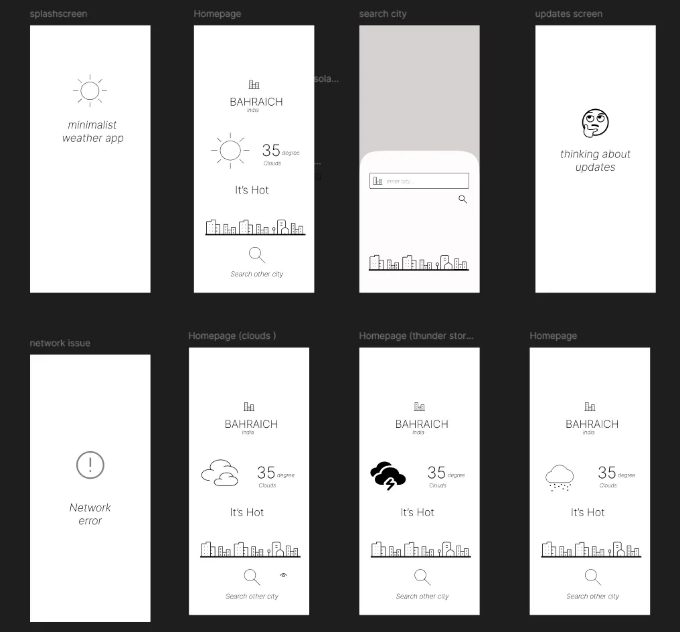
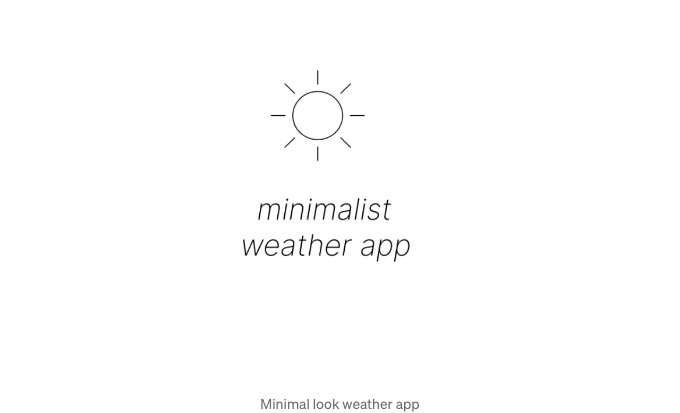
그래서, 이게 제가 디자인한 거에요. 가능한 한 간단하게 만들려고 노력했어요. 색상도 없고 멋진 건 없어요. 괜찮음이 최고죠!
코딩 부분 :
이제 어려운 부분이 시작됐습니다 (그렇게 어렵지는 않아요. 그냥 날씨 앱이거든요. 유튜브에 수백 개의 자습서를 찾을 수 있을 거에요) — 코딩이죠. 빠른 조언: 앱을 만드는 게 목표라면, 워크플로부터 시작해보세요. 멋진 걸 하려 할 필요는 없어요; 종이 한 장 가지고 무엇을 만들 계획 중인지 적어보세요. 항상 완전한 앱을 고려해보세요.
예를 들어 전자 상거래 앱을 고려해보세요. 기본 레이아웃은 무엇이어야 할까요?
- 홈페이지
- 다양한 제품 및 카테고리 검색 화면
- 제품 상세 화면
- 장바구니 화면
- 주문 완료 화면
물론, 이 외에도 많은 요소가 있지만, 이렇게 계획을 세우면 앱 시작부터 끝까지의 고정된 개발 방향을 얻을 수 있습니다. 이 방법이 저에게 효과적으로 작동했어요. 프로젝트가 완전히 계획되지 않았을 때 저를 괴롭히고 미루게 만던 일이 많았거든요. 이 기본적인 날씨 앱의 경우, 별도의 워크플로를 설계할 필요가 없었습니다.
이 프로젝트를 다음과 같이 나누어 봅시다:
내가 하는 일은 Figma 디자인과 유사한 앱의 완전한 UI를 구축한 다음 서비스 및 API 부분으로 넘어가는 것이에요. 그 다음에는 다양한 애니메이션을 시도해보죠. Figma에서 디자인하고 다양한 애니메이션을 시도할 필요는 없어요. 그렇게 하면 시간이 많이 소요될 수 있어요. 대신, 앱이 제대로 작동한 후에 코드로 직접 애니메이션을 시도해보세요. 다시 한 번 강조하지만, 애니메이션에 너무 신경 쓸 필요는 없어요. 저는 단지 애니메이션을 위해 animate 패키지를 사용했죠.
그리고 한 가지 더: 의존성 및 패키지는 생명 구원자들이에요. 특히 학습 단계에서는 주저하지 말고 사용하세요.
API 부분은 즐거워요 :
한 번 앱에 API를 구현하면 멈출 수가 없어요. API와 모델/서비스에 익숙해지기 시작하면 실제로 앱 개발을 즐기기 시작할 거예요.
실제 코드 :
의존성: 제가 사용한 종속성들입니다.

이 앱의 핵심 - WeatherData services class page입니다.
import 'dart:convert';

import 'package:basicweatherapp/constants.dart';
import 'package:geocoding/geocoding.dart';
import 'package:geolocator/geolocator.dart';
import 'package:http/http.dart' as https;

class WeatherData {
  String? cityname;
  static const base_url = "http://api.openweathermap.org/data/2.5/weather";
  Position? data;

  // 현재 위치의 도시 이름을 반환하는 메서드
  Future<String> getcurrentcity() async {
    // 위치 권한 요청
    LocationPermission permission = await Geolocator.requestPermission();
    if (permission == LocationPermission.denied) {
      await Geolocator.requestPermission();
    }

    // 현재 위치의 위도와 경도 데이터를 가져옴
    Position position = await Geolocator.getCurrentPosition(
        desiredAccuracy: LocationAccuracy.high);

    // 위도와 경도 정보를 기반으로 현재 도시를 가져옴
    List<Placemark> placemark =
        await placemarkFromCoordinates(position.latitude, position.longitude);
    String? city = placemark[0].locality ?? "Bahraich";
    return city;
  }

  // 도시를 기반으로 날씨 데이터 반환
  Future getWeatherReport(String city) async {
    // API를 호출하여 날씨 데이터 가져오기
    https.Response response =
        await https.get(Uri.parse("$base_url?q=$city&appid=$api&units=metric"));
    if (response.statusCode == 200) {
      var data = jsonDecode(response.body);
      return data;
    }
    else {
      throw Exception("날씨 데이터를 불러오는 데 실패했습니다");
    }
  }
}
모델을 사용하지 않았지만 이해를 돕기 위해 간단하게 작성했습니다.
API를 성공적으로 호출할 때 데이터가 어떻게 보이는지 예시입니다. 맵과 리스트에 대한 이해가 있으면 이해하기 쉬울 것입니다.
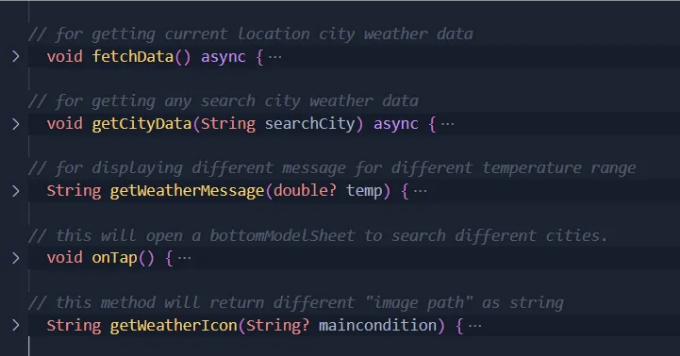
기능 및 메소드: 이 앱에서 사용한 총 5개의 메소드에 대한 설명이 제대로 주석으로 달려 있습니다(전체 코드는 게시물의 뒷부분에 제공됩니다). 이러한 메소드는 홈 화면에서 사용됩니다.
홈 화면 코드:
처음에는 코드가 복잡해 보일 수 있지만 전체 코드를 읽으면 모든 것을 이해할 수 있을 건데요.
import 'package:basicweatherapp/constants.dart';
import 'package:basicweatherapp/networkErrorPage.dart';

import 'package:basicweatherapp/weatherdata.dart';
import 'package:basicweatherapp/widgets/Drawercontent.dart';
import 'package:flutter/material.dart';
import 'package:flutter_animate/flutter_animate.dart';

class HomePage extends StatefulWidget {
  const HomePage({super.key});

  @override
  State<HomePage> createState() => _HomePageState();
}

class _HomePageState extends State<HomePage> {
  TextEditingController citycontroller = TextEditingController();
  WeatherData weatherData = WeatherData();

  String? city;
  double? temp;
  String? condition;
  String? country;
  bool isLoading = true; // 이 상태 변수를 추가했어요

// 현재 위치 도시 날씨 데이터를 가져오기
  void fetchData() async {
    setState(() {
      isLoading = true; // 데이터를 가져오기 시작할 때 로딩을 true로 설정해줘요
    });

    String cityname = await weatherData.getcurrentcity();

    try {
      final weather = await weatherData.getWeatherReport(cityname);
      setState(() {
        city = weather["name"];
        temp = weather["main"]["temp"];
        condition = weather["weather"][0]["main"];
        country = weather["sys"]["country"];
        isLoading = false; // 데이터를 가져온 후에 로딩을 false로 설정해줘요
      });
    } catch (e) {
      setState(() {
        isLoading = false; // 에러가 발생해도 로딩을 false로 설정해줘요
      });
      Navigator.push(
        context,
        MaterialPageRoute(
          builder: (context) => NetworkErrorPage(
            retryCallback: fetchData,
          ),
        ),
      );
    }
  }

// 특정 도시 날씨 데이터 가져오기
  void getCityData(String searchCity) async {
    setState(() {
      isLoading = true; // 데이터를 가져오기 시작할 때 로딩을 true로 설정해줘요
    });

    try {
      final weather = await weatherData.getWeatherReport(searchCity);
      setState(() {
        city = weather["name"];
        temp = weather["main"]["temp"];
        condition = weather["weather"][0]["main"];
        country = weather["sys"]["country"];
        isLoading = false; // 데이터를 가져온 후에 로딩을 false로 설정해줘요
      });
    } catch (e) {
      setState(() {
        isLoading = false;

        Navigator.push(
          context,
          MaterialPageRoute(
            builder: (context) => NetworkErrorPage(
              retryCallback: fetchData,
            ),
          ),
        );
      });
    }
  }

// 다른 온도 범위에 따라 다른 메시지를 표시해주는 메소드
  String getWeatherMessage(double? temp) {
    if (temp == null) return "로딩 중...";

    if (temp <= 0) {
      return "추워요... 따뜻하게 입으세요!";
    } else if (temp > 0 && temp <= 10) {
      return "쌀쌀해요. 자켓을 입어요!";
    } else if (temp > 10 && temp <= 20) {
      return "시원한 날씨에요. 신선한 공기를 즐기세요!";
    } else if (temp > 20 && temp <= 30) {
      return "따뜻하고 쾌적해요. 야외 활동하기 딱 좋아요!";
    } else if (temp > 30 && temp <= 40) {
      return "더워요. 수분을 보충하세요!";
    } else {
      return "극심한 더위! 주의를 기울이고 시원하게 지내세요.";
    }
  }

// 이 메소드는 "메인 날씨 조건"에 따라 다른 "이미지 경로"를 문자열로 반환해줘요
  String getWeatherIcon(String? maincondition) {
    if (maincondition == null) return "images/sunny.png";

    switch (maincondition.toLowerCase()) {
      case "clouds":
      case "fog":
      case "dust":
      case "mist":
      case "haze":
        return "images/clouds.png";

      case "rain":
      case "drizzle":
      case "shower rain":
        return "images/rain.png";

      case "thunderstand":
        return "images/thunderstorm.png";

      case "clear":
        return "images/sunny.png";

      default:
        return "images/sunny.png";
    }
  }

  WeatherData data = WeatherData();

  @override
  void initState() {
    // TODO: implement initState
    super.initState();
    fetchData();
  }

  @override
  Widget build(BuildContext context) {
    Size size = MediaQuery.of(context).size;
    return Scaffold(
      drawer: Drawer(
        child: DrawerContent(),
        width: size.width * 0.5,
      ).animate().fadeIn(duration: 1.seconds),
      appBar: AppBar(
        actions: [
          Padding(
            padding: EdgeInsets.only(right: 10),
            child: InkWell(
              onTap: () {
                fetchData();
              },
              child: Icon(
                Icons.location_on_outlined,
                size: 30,
              ).animate().fadeIn(duration: 1.seconds),
            ),
          )
        ],
      ),
      body: isLoading ? buildLoadingIndicator() : showUi(),
    );
  }

  Widget buildLoadingIndicator() {
    return Center(
      child: Column(
        mainAxisAlignment: MainAxisAlignment.center,
        children: [
          Text(
            "날씨 데이터를 불러오는 중..",
            style: TextStyle(
              fontSize: 20,
              fontWeight: FontWeight.w300,
            ),
          ),
          SizedBox(
            height: 10,
          ),
          CircularProgressIndicator(
            color: Colors.black,
            strokeWidth: 1.5,
          )
        ],
      ),
    );
  }

  Widget showUi() {
    Size size = MediaQuery.of(context).size;
    return Padding(
      padding: const EdgeInsets.symmetric(horizontal: 16, vertical: 8),
      child: SingleChildScrollView(
        child: Column(
          children: [
            SizedBox(
              height: 15,
            ),
            Image.asset("images/city.png")
                .animate()
                .fadeIn(duration: 1.seconds),
            SizedBox(
              height: 10,
            ),
            Text(
              city ?? "",
              style: TextStyle(
                fontSize: 25,
                fontWeight: FontWeight.w300,
              ),
            ).animate().fadeIn(duration: 1.seconds),
            Text(
              country ?? " ",
              style: TextStyle(
                fontSize: 15,
                fontStyle: FontStyle.italic,
                fontWeight: FontWeight.w300,
              ),
            ).animate().fadeIn(duration: 1.seconds),
            SizedBox(
              height: 15,
            ),
            Row(
              children: [
                Padding(
                  padding: EdgeInsets.only(left: 20),
                  child: Image.asset(
                    getWeatherIcon(condition),
                  ).animate().fadeIn(duration: 1.seconds),
                ),
                SizedBox(width: 40),
                Column(
                  children: [
                    Row(
                      children: [
                        Text(
                          temp?.toString() ?? " ",
            style: style,
                        ).animate().fadeIn(duration: 1.seconds),
                        Text(
                          " °C",
            style: style,
                        ).animate().fadeIn(duration: 1.seconds),
                      ],
                    ),
                    Text(
                      condition ?? " ",
                      style: const TextStyle(
                        fontSize: 15,
                        fontStyle: FontStyle.italic,
                        fontWeight: FontWeight.w300,
                      ),
                    ).animate().fadeIn(duration: 1.seconds),
                  ],
                ),
              ],
            ),
            SizedBox(
              height: size.height * 0.12,
            ),
            Text(
              getWeatherMessage(temp),
              style: TextStyle(
                fontSize: 25,
                fontWeight: FontWeight.w300,
              ),
            ).animate().fadeIn(duration: 1.seconds).then(delay: 1000.ms).slide(),
            SizedBox(height: size.height * 0.06),
            Image.asset("images/cities.png").animate().fadeIn(duration: 1.seconds),
            SizedBox(height: size.height * 0.07),
            InkWell(
              onTap: onTap,
              child: Hero(
                tag: "search",
                child: Image.asset("images/search.png"),
              ),
            ),
            SizedBox(height: 5),
            GestureDetector(
              onTap: onTap,
              child: Text(
                '다른 도시 찾기',
                style: TextStyle(
                  fontSize: 20,
                  fontStyle: FontStyle.italic,
                  fontWeight: FontWeight.w300,
                ),
              ).animate().fadeIn(duration: 1.seconds),
            ),
          ],
        ),
      ),
    );
  }

// 이 메소드는 다른 도시를 검색하기 위해 bottomModelSheet를 열어줘요.
  void onTap() {
    showModalBottomSheet(
      context: context,
      builder: (context) {
        return SingleChildScrollView(
          keyboardDismissBehavior: ScrollViewKeyboardDismissBehavior.onDrag,
          child: Column(
            children: [
              SizedBox(
                height: 40,
              ),
              Padding(
                padding: EdgeInsets.symmetric(horizontal: 30),
                child: TextField(
                  controller: citycontroller,
                  decoration: InputDecoration(
                    hintStyle: TextStyle(
                      color: