
Flow 위젯은 레이아웃 위젯의 한 종류로, 개발자에게 레이아웃에 대한 세밀한 제어를 제공합니다. Flow 위젯의 flow-delegate는 다른 레이아웃 위젯과 구별됩니다. Flow를 사용하면 다음과 같은 간단한 레이아웃을 구성할 수 있습니다:
- Column
- Row
- Grid
- Stack
하지만 이미 위에서 정의한 레이아웃 위젯이 있는데 왜 Flow를 사용해야 할까요?
이 질문에 대한 답은 플로 위젯이 제공하는 사용자 정의 수준입니다.
Flow 위젯을 사용하여 간단한 레이아웃을 디자인할 수 있을 뿐만 아니라 다양한 애니메이션과 효과를 추가할 수도 있습니다. 더 자세한 내용은 플러터에서 제공하는 공식 문서를 확인할 수 있어요.
Flow를 시작하기 위해서는 해당 구문을 사용해봅시다.
Flow(
      delegate: YourFlowDelegate(),
      children: [],
      clipBehaviour:
)
Flow widget은 3개의 매개변수를 사용합니다.
-
delegate: FlowDelegate를 제공하는 필수 속성입니다. FlowDelegate는 자식들의 레이아웃을 결정하는 역할을 합니다. 이 delegate는 자식들을 Flow 위젯 내에서 어떻게 위치하고 크기를 조절할지 제어합니다.
-
clipBehavior: Flow 위젯의 영역 내에서 콘텐츠를 자르는 방법을 결정합니다. 기본값은 Clip.hardEdge입니다. 다른 옵션에는 Clip.none, Clip.antiAlias, Clip.antiAliasWithSaveLayer 등이 있습니다.
-
자식들의 목록
class YourFlowDelegate extends FlowDelegate {

  @override
  void paintChildren(FlowPaintingContext context) {
  }

  @override
  bool shouldRepaint(covariant FlowDelegate oldDelegate) {
  }

}
만약 FlowDelegate 클래스를 확장하여 사용자 정의 flow delegate를 생성하는 경우, 구현해야 할 두 가지 필수 메서드가 있습니다.
FlowDelegate는 사용자 정의 레이아웃을 만들기 위해 서브클래스로 만들어야 하는 추상 클래스입니다. 다음은 재정의해야 하는 중요한 메서드들입니다:
- (필수) paintChildren(FlowPaintingContext context): 이 메서드는 Flow 위젯의 자식들을 그리기 위해 호출됩니다. FlowPaintingContext를 사용하여 자식들에 대한 정보를 얻고 위치 및 크기를 지정할 수 있습니다. 여러 레이아웃과 효과를 만들기 위해 변환 매트릭스를 사용할 수 있습니다.
- (필수) shouldRepaint(ListFlowDelegate oldDelegate): 이 메서드는 delegate이 변경될 때 레이아웃을 다시 그려야 하는지를 결정하기 위해 호출됩니다.
- (옵션) getSize: 이 메서드는 flow의 크기를 반환합니다. 필요에 따라 사용자 정의 크기를 제공해야 하는 경우 이 메서드를 재정의할 수 있습니다.
- (옵션) getConstraintsForChild: 이 메서드는 각 자식에 대한 제약 조건을 반환합니다. 필요에 따라 사용자 정의 제약 조건을 제공해야 하는 경우 이 메서드를 재정의할 수 있습니다.
위의 개념을 이해하기 위해 몇 가지 예시를 살펴봅시다.
이 예시에서는 사용자가 왼쪽 또는 오른쪽으로 슬라이드하여 확장 또는 축소할 수 있는 간단한 스택 원형 카드를 만들어 보겠습니다.
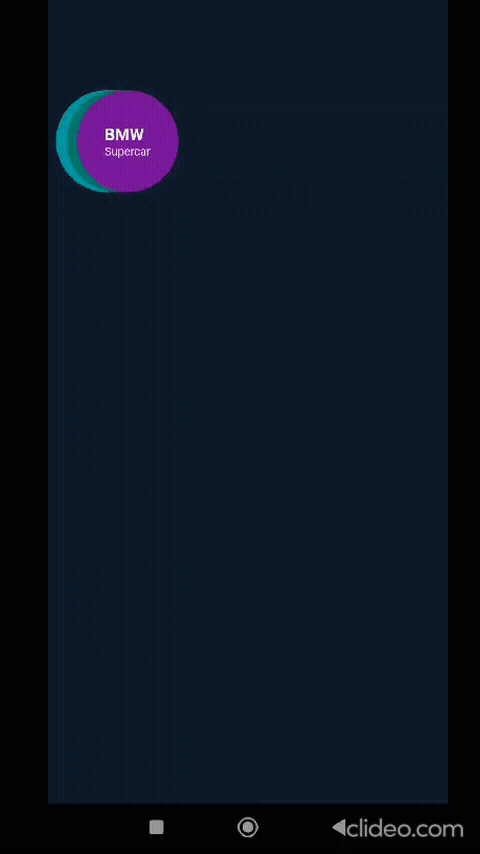
일단 flow 위젯을 사용하여 간단한 스택 카드를 만들어 보겠습니다.
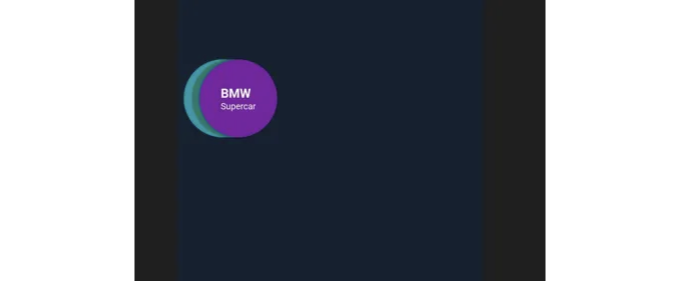
이 레이아웃을 달성하려면 먼저 원 모양의 카드를 Flow 위젯으로 감싸고 그 안에 FlowDelegate를 설정하여 각 카드의 x 좌표를 이전 카드의 10px 앞에 놓아야 합니다.
class FlowExample extends StatefulWidget {
  const FlowExample({Key? key}) : super(key: key);

  @override
  State<FlowExample> createState() => _FlowExampleState();
}

class _FlowExampleState extends State<FlowExample> {
  @override
  Widget build(BuildContext context) {
    return Column(
      children: [
        Container(
          height: 250,
          padding: const EdgeInsets.only(top: 100),
          child: Flow(
            clipBehavior: Clip.antiAlias,
            delegate: ListFlowDelegate(),
            children: [
              for (int i = 1; i < 4; i++)
                TextCard(
                  title: carsData[i].name,
                  subTitle: carsData[i].place,
                  color: carsData[i].color,
                )
            ],
          ),
        ),
        const SizedBox(
          height: 50,
        ),
      ],
    );
  }
}

class ListFlowDelegate extends FlowDelegate {
  @override
  void paintChildren(FlowPaintingContext context) {
    for (int i = 0; i < context.childCount; i++) {

      // 이전 카드의 10px 앞에 각 카드의 x 좌표 설정
      double dx = i * 10;
      context.paintChild(i, transform: Matrix4.translationValues(dx, 0, 0));
    }
  }

  @override
  bool shouldRepaint(ListFlowDelegate oldDelegate) {
    return false;
  }
}
슬라이딩 효과를 만들기 위해 애니메이션 컨트롤러와 제스처 감지기를 추가해봅시다.
먼저 애니메이션 컨트롤러를 추가하고 원하는 값으로 초기화해야 합니다.
class _FlowExampleState extends State<FlowExample> with SingleTickerProviderStateMixin {

  late AnimationController dragAnimation;

  @override
  void initState() {
    super.initState();
    dragAnimation = AnimationController(
      lowerBound: 0,
      value: 0,
      upperBound: 1,
      duration: const Duration(milliseconds: 500),
      vsync: this,
    );
  }
.
.
.
그런 다음 이 애니메이션 컨트롤러를 플로우 델리게이트에 전달하십시오.
 Flow(
       clipBehavior: Clip.antiAlias,
       delegate: ListFlowDelegate(dragAnimation: dragAnimation),
...


class ListFlowDelegate extends FlowDelegate {
   ListFlowDelegate({required this.dragAnimation})
      : super(repaint: dragAnimation);
  final Animation<double> dragAnimation;

  @override
  void paintChildren(FlowPaintingContext context) {
    for (int i = 0; i < context.childCount; i++) {
      double dx = i * 10;
      context.paintChild(i, transform: Matrix4.translationValues(dx, 0, 0));
    }
  }

  @override
  bool shouldRepaint(ListFlowDelegate oldDelegate) {
    return false;
  }
}
나머지는 FlowDelegate 클래스 내에서 제스처 감지기를 추가하여 왼쪽과 오른쪽 스와이프를 감지하도록하십시오.
Flow(
            clipBehavior: Clip.antiAlias,
            delegate: ListFlowDelegate(dragAnimation: dragAnimation),
            children: [
              for (int i = 1; i < 4; i++)
                GestureDetector(
                  onHorizontalDragEnd: (DragEndDetails drag) {
                    if (drag.primaryVelocity == null) return;
                    if (drag.primaryVelocity! < 0) {
                      //왼쪽에서 오른쪽
                      dragAnimation.reverse();
                      //애니메이션 값 0 <- 1
                    } else {
                      //오른쪽에서 왼쪽
                      dragAnimation.forward();
                      //애니메이션 값 0 -> 1
                    }
                  },
                  child: TextCard(
                    title: carsData[i].name,
                    subTitle: carsData[i].place,
                    color: carsData[i].color,
                  ),
                )
            ],
          )
마지막으로 FlowDelegate 클래스 내에서 애니메이션 컨트롤러를 사용하여 원형 카드의 x 좌표를 업데이트하고 위젯을 다시 그리십시오.
class ListFlowDelegate extends FlowDelegate {
  ListFlowDelegate({required this.dragAnimation})
      : super(repaint: dragAnimation);
  final Animation<double> dragAnimation;
  @override
  void paintChildren(FlowPaintingContext context) {
    for (int i = 0; i < context.childCount; i++) {
      double dx = i * 10 +
          (context.getChildSize(i)!.width.toDouble() * i * dragAnimation.value);
      context.paintChild(i, transform: Matrix4.translationValues(dx, 0, 0));
    }
  }

  @override
  bool shouldRepaint(ListFlowDelegate oldDelegate) {
    return dragAnimation != oldDelegate.dragAnimation;
  }
}
참고용 완성된 코드입니다
import 'package:flow_demo/data.dart';
import 'package:flutter/material.dart';

const Color darkBlue = Color.fromARGB(255, 18, 32, 47);

class FlowExample extends StatefulWidget {
  const FlowExample({Key? key}) : super(key: key);

  @override
  State<FlowExample> createState() => _FlowExampleState();
}

class _FlowExampleState extends State<FlowExample>
    with SingleTickerProviderStateMixin {
  late AnimationController dragAnimation;

  @override
  void initState() {
    super.initState();
    dragAnimation = AnimationController(
      lowerBound: 0,
      value: 0,
      upperBound: 1,
      duration: const Duration(milliseconds: 500),
      vsync: this,
    );
  }

  @override
  Widget build(BuildContext context) {
    return Column(
      children: [
        Container(
          height: 250,
          padding: const EdgeInsets.only(top: 100),
          child: Flow(
            clipBehavior: Clip.antiAlias,
            delegate: ListFlowDelegate(dragAnimation: dragAnimation),
            children: [
              for (int i = 1; i < 4; i++)
                GestureDetector(
                  onHorizontalDragEnd: (DragEndDetails drag) {
                    if (drag.primaryVelocity == null) return;
                    if (drag.primaryVelocity! < 0) {
                      //left to right
                      dragAnimation.reverse();
                      //animation value 0 <- 1
                    } else {
                      //right to left
                      dragAnimation.forward();
                      //animation value 0 -> 1
                    }
                  },
                  child: TextCard(
                    title: carsData[i].name,
                    subTitle: carsData[i].place,
                    color: carsData[i].color,
                  ),
                )
            ],
          ),
        ),
        const SizedBox(
          height: 50,
        ),
      ],
    );
  }
}

class ListFlowDelegate extends FlowDelegate {
  ListFlowDelegate({required this.dragAnimation})
      : super(repaint: dragAnimation);
  final Animation<double> dragAnimation;
  @override
  void paintChildren(FlowPaintingContext context) {
    for (int i = 0; i < context.childCount; i++) {
      double dx = i * 10 +
          (context.getChildSize(i)!.width.toDouble() * i * dragAnimation.value);
      context.paintChild(i, transform: Matrix4.translationValues(dx, 0, 0));

      //can add scaling transformation also
      // double scale = 0.4 + 0.02 * i;
      //   context.paintChild(i,
      // transform: Matrix4.translationValues(dx, 0, 0)..scale(scale));
    }
  }

  @override
  bool shouldRepaint(ListFlowDelegate oldDelegate) {
    return dragAnimation != oldDelegate.dragAnimation;
  }
}

class CarsCard extends StatelessWidget {
  const CarsCard({
    super.key,
    required this.selectedCard,
  });

  final int? selectedCard;

  @override
  Widget build(BuildContext context) {
    return SizedBox(
      width: MediaQuery.sizeOf(context).width,
      height: 250,
      child: Padding(
        padding: const EdgeInsets.all(16.0),
        child: ClipRRect(
          borderRadius: const BorderRadius.all(Radius.circular(16)),
          child: Stack(
            children: <Widget>[
              Positioned.fill(
                child: Image.network(
                  carsData[selectedCard!].imageUrl,
                  fit: BoxFit.cover,
                ),
              ),
              Positioned.fill(
                child: DecoratedBox(
                  decoration: BoxDecoration(
                    gradient: LinearGradient(
                      colors: [
                        Colors.transparent,
                        Colors.black.withOpacity(0.8)
                      ],
                      begin: Alignment.topCenter,
                      end: Alignment.bottomCenter,
                      stops: const [0.4, 0.95],
                    ),
                  ),
                ),
              ),
              Positioned(
                left: 16,
                bottom: 20,
                child: Text(
                  carsData[selectedCard!].name,
                  style: const TextStyle(
                    fontSize: 24.0,
                    fontWeight: FontWeight.bold,
                  ),
                ),
              ),
            ],
          ),
        ),
      ),
    );
  }
}

class TextCard extends StatelessWidget {
  final String title, subTitle;
  final Color color;

  const TextCard(
      {required this.title,
      required this.subTitle,
      required this.color,
      super.key});

  @override
  Widget build(BuildContext context) {
    return Container(
      decoration: BoxDecoration(
        shape: BoxShape.circle,
        color: color,
      ),
      width: 100,
      alignment: Alignment.center,
      height: 100,
      margin: const EdgeInsets.all(8),
      padding: const EdgeInsets.all(8),
      child: Column(
          crossAxisAlignment: CrossAxisAlignment.start,
          mainAxisAlignment: MainAxisAlignment.center,
          children: [
            Text(
              title,
              style: const TextStyle(
                color: Color(0xffFFFFFF),
                fontSize: 20,
                fontWeight: FontWeight.bold,
              ),
            ),
            Text(
              subTitle,
              style: const TextStyle(
                color: Color(0xffFFFFFF),
                fontSize: 14,
              ),
            ),
          ]),
    );
  }
}
여기에서 소스 코드를 찾을 수 있습니다...