파이썬과 GitHub 페이지로 나만의 링크트리(LinkTree) 만들기
루카스 네베스 페레이라의 글 "Go와 GitHub Pages로 나만의 링크트리(LinkTree) 만들기"를 우연히 발견했어요. 이 글은 Go를 사용하여 LinkTree와 유사한 페이지(Taplink)를 만드는 방법에 대해 설명하고 있어요. 저는 파이썬 애호가로서 이 프로젝트를 파이썬으로 구현하기로 결정했어요. 제가 개발한 내용을 아래에서 확인해보세요.
단계 1: 프로젝트 파일 구조 준비하기
먼저 프로젝트를 위한 파일 구조를 만들어봅시다. GitHub Pages에 쉽게 유지보수하고 배포할 수 있도록 구성해보겠습니다.
파일 구조:
/ (루트) |-- /docs | |-- index.html | |-- /assets | |-- (스타일, 스크립트, 아이콘 등) |-- config.yml |-- generate_site.py |-- /themes
- /docs: 이 폴더에는 생성된 HTML 파일과 필요한 모든 에셋(이미지, 스타일, 스크립트)이 들어갑니다. 이 폴더는 GitHub Pages에 배포할 때 사용됩니다.
- config.yml: 사이트를 개인화하는 데 필요한 모든 데이터를 포함하는 구성 파일입니다.
- generate_site.py: config.yml에서 가져온 데이터를 기반으로 사이트를 생성하는 파이썬 스크립트입니다.
- /themes: 사이트를 위한 테마가 들어있는 폴더입니다. 여기서는 HTML 템플릿, 스타일, 스크립트 및 이미지가 포함된 사용자 정의 테마가 있습니다.
단계 2: 구성 파일(config.yml) 구성하기
config.yml 파일에는 사이트에 표시될 사용자 데이터 및 링크가 포함되어 있습니다. 여기에 내용이 있습니다:
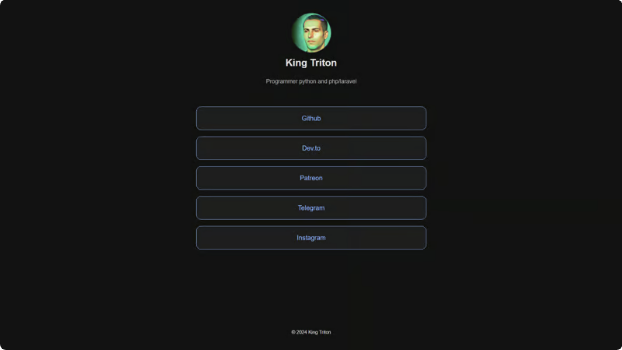
name: "킹 트리톤"
picture: "assets/img/picture.jpg"
bio: "프로그래머 파이썬 및 php/laravel"
meta:
  lang: "en"
  description: "프로그래머 파이썬 및 php/laravel"
  title: "킹 트리톤"
  author: "킹 트리톤"
  siteUrl: "https://king-tri-ton.github.io"
links:
  - name: "깃허브"
    url: "https://github.com/king-tri-ton"
  - name: "Dev.to"
    url: "https://dev.to/king_triton"
  - name: "Patreon"
    url: "https://www.patreon.com/king_triton"
  - name: "텔레그램"
    url: "https://t.me/king_triton"
  - name: "인스타그램"
    url: "https://www.instagram.com/king_tri_ton"
theme: "custom"
- name: 사이트에 표시될 사용자의 이름입니다.
- picture: 사용자 이미지의 경로입니다.
- bio: 사용자의 간단한 전기입니다.
- meta: 사이트 메타데이터 (언어, 설명, 제목, 작성자, 사이트 URL)입니다.
- links: 사이트에 표시될 링크 목록입니다. 각 항목에는 이름과 URL이 포함됩니다.
- theme: 사용할 사이트 테마입니다.
단계 3: 사이트를 생성하는 Python 스크립트 개발하기 (generate_site.py)
이제 테마 템플릿과 config.yml에서 데이터를 활용하여 HTML 파일을 생성하는 Python 스크립트를 작성할 것입니다.
import os
import shutil
from jinja2 import Environment, FileSystemLoader
import yaml

# 설정 파일 로드
with open('config.yml', 'r') as config_file:
    config = yaml.safe_load(config_file)

# 출력 디렉토리 생성
output_dir = 'docs'
os.makedirs(output_dir, exist_ok=True)

# Jinja2 설정
env = Environment(loader=FileSystemLoader('themes/custom'))
template = env.get_template('index.html')

# HTML 파일 생성
output_html = template.render(config=config)
with open(os.path.join(output_dir, 'index.html'), 'w') as fh:
    fh.write(output_html)

# 에셋 폴더를 출력 디렉토리로 복사
assets_source = os.path.join('themes', config['theme'], 'assets')
assets_dest = os.path.join(output_dir, 'assets')
if os.path.exists(assets_source):
    shutil.copytree(assets_source, assets_dest, dirs_exist_ok=True)

print("사이트가 성공적으로 생성되었습니다.")
- 설정 로드: 스크립트는 config.yml에서 데이터를 로드합니다.
- 출력 디렉토리 생성: docs 폴더는 존재하지 않을 경우 자동으로 생성됩니다.
- Jinja2 설정: Jinja2를 사용하여 HTML 템플릿을 로드하고 내용을 렌더링합니다.
- HTML 파일 생성: 스크립트는 구성 데이터를 사용하여 index.html을 생성하고 docs 폴더에 저장합니다.
- 에셋 복사: 모든 에셋(CSS, 이미지, 스크립트)은 docs/assets 폴더로 복사됩니다.
단계 4: 테마 및 에셋 생성
이제 사이트에 사용할 테마를 만들어보세요. themes/custom/ 폴더 안에는 다음과 같은 파일이 있어야 합니다:
themes/custom/index.html
이 파일은 구성 파일에서 변수를 사용하여 사이트에 대한 메인 HTML 템플릿입니다.
<!DOCTYPE html>
<html lang="{ config.meta.lang }">
<head>
    <meta charset="UTF-8">
    <meta name="viewport" content="width=device-width, initial-scale=1.0">
    <meta name="description" content="{ config.meta.description }">
    <title>{ config.meta.title }</title>
    <meta name="author" content="{ config.meta.author }">
    <link rel="canonical" href="{ config.meta.siteUrl }">
    <link rel="icon" type="image/x-icon" href="assets/icons/favicon.ico">
    <link rel="stylesheet" href="assets/css/styles.css">
    <meta property="og:title" content="{ config.meta.title }">
    <meta property="og:site_name" content="{ config.meta.title }">
    <meta property="og:description" content="{ config.meta.description }">
    <meta property="og:locale" content="{ config.meta.lang }">
    <meta name="twitter:title" content="{ config.meta.title }">
    <meta name="twitter:description" content="{ config.meta.description }">
</head>
<body>
    <header>
        <img src="{ config.picture }" alt="Picture" class="avatar">
        <h1>{ config.name }</h1>
        <small class="bio">{ config.bio }</small>
    </header>
    <main>
        <section class="links">
            { for link in config.links }
            <a class="link-item" href="{ link.url }" target="_blank" rel="noopener noreferrer">
                <p>{ link.name }</p>
            </a>
            { endfor }
        </section>
    </main>
    <footer>
        <small>© <span class="year"></span> { config.meta.author }</small>
    </footer>
    <script src="assets/js/script.js"></script>
</body>
</html>
themes/custom/assets/styles.css
페이지를 스타일링하는 CSS 파일입니다.
/* CSS Reset */
* {
  margin: 0;
  padding: 0;
  box-sizing: border-box;
}

/* Variables */
:root {
  --max-width: 600px;
  --font-family: 'Inter', sans-serif;
  --padding: 1rem;
  --header-margin-bottom: 1rem;
  --line-height: 2;
  --font-size: 16px;

  --primary-color-light: #ffffff;
  --background-color-light: #f0f0f0;
  --text-color-light: #333;
  --link-color-light: #1a73e8;
  --bio-color-light: #666;

  --primary-color-dark: #1e1e1e;
  --background-color-dark: #121212;
  --text-color-dark: #e0e0e0;
  --link-color-dark: #8ab4f8;
  --bio-color-dark: #aaa;
}

/* Light Theme */
@media (prefers-color-scheme: light) {
  :root {
    --primary-color: var(--primary-color-light);
    --background-color: var(--background-color-light);
    --text-color: var(--text-color-light);
    --link-color: var(--link-color-light);
    --bio-color: var(--bio-color-light);
  }
}

/* Dark Theme */
@media (prefers-color-scheme: dark) {
  :root {
    --primary-color: var(--primary-color-dark);
    --background-color: var(--background-color-dark);
    --text-color: var(--text-color-dark);
    --link-color: var(--link-color-dark);
    --bio-color: var(--bio-color-dark);
  }
}

/* Global Styles */
html {
  font-family: var(--font-family);
  font-size: var(--font-size);
  line-height: var(--line-height);
}

body {
  max-width: var(--max-width);
  min-height: 100vh;
  margin: 0 auto;
  display: flex;
  flex-direction: column;
  align-items: center;
  background-color: var(--background-color);
  color: var(--text-color);
  padding: var(--padding);
}

/* Header Styles */
header {
  padding: var(--padding) 0;
  margin-bottom: var(--header-margin-bottom);
  width: 100%;
  display: flex;
  flex-direction: column;
  justify-content: center;
  align-items: center;
  text-align: center;
}

.avatar {
  width: 100px;
  height: 100px;
  border-radius: 50%;
  object-fit: cover;
  border: 2px solid var(--primary-color);
  box-shadow: 0 4px 8px rgba(0, 0, 0, 0.1);
}

h1 {
  font-size: 24px;
  margin-bottom: 0.5rem;
}

.bio {
  font-size: 14px;
  color: var(--bio-color);
  margin-bottom: 1rem;
}

/* Main Content Styles */
main {
  width: 100%;
  flex: 1;
}

.links {
  display: flex;
  flex-direction: column;
  gap: 1rem;
  text-align: center;
  overflow-y: auto;
  max-height: 400px;
}

.link-item {
  display: block;
  padding: 16px 20px;
  text-decoration: none;
  color: var(--link-color);
  background: var(--primary-color);
  border-radius: 12px;
  border: 1px solid var(--link-color);
  transition: background-color 0.25s, color 0.25s;
}

.link-item:hover,
.link-item:focus {
  background-color: var(--link-color);
  color: var(--primary-color);
}

.link-item p {
  line-height: 1.5;
  font-weight: 500;
}

/* Footer Styles */
footer {
  width: 100%;
  text-align: center;
  padding: 1rem 0;
  font-size: 14px;
  gap: 1rem;
  display: flex;
  justify-content: center;
  align-items: center;
}

/* ScrollBar */
::-webkit-scrollbar {
  width: 5px;
}

::-webkit-scrollbar-track {
  background: transparent;
}

::-webkit-scrollbar-thumb {
  background: transparent;
}

::-webkit-scrollbar-thumb:hover {
  background: transparent;
}
themes/custom/assets/js/script.js
기본 기능을 위한 JavaScript 파일입니다.
console.log("스크립트 로드됨");

const yearDate = new Date().getFullYear().toString();
document.querySelector(".year").innerText = yearDate;
themes/custom/assets/img/picture.jpg
아바타로 사용된 사진이에요.
단계 5: 사이트 생성
모든 파일을 생성한 후에는 generate_site.py 스크립트를 실행하여 사이트를 생성하세요:
python generate_site.py
사이트는 docs 폴더에 생성될 것입니다.
단계 6: GitHub Pages에 배포하기
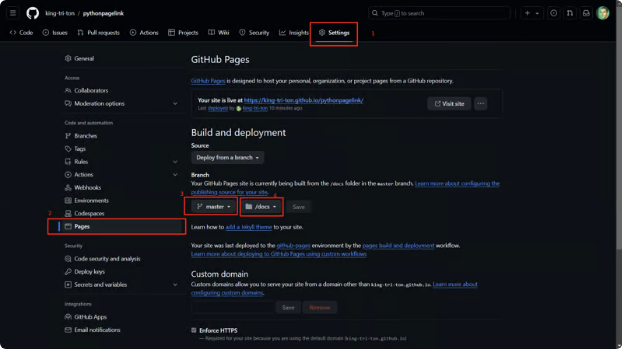
- GitHub에서 새 저장소를 생성합니다.
- docs 폴더를 포함한 모든 파일을 저장소에 업로드합니다.
- 저장소의 설정 섹션으로 이동합니다.
- 페이지 섹션에서 마스터 브랜치와 /docs 폴더를 소스로 선택합니다.
- 변경 사항을 저장하고 GitHub Pages가 사이트를 배포할 때까지 기다립니다.
이제 당신의 사이트는 https://username.github.io/repository-name/ 에서 이용 가능합니다.
그게 다에요! 이제 Python으로 만들어진 LinkTree 스타일의 사이트를 GitHub Pages에 배포하였습니다. 최종 결과물은 https://king-tri-ton.github.io/pythonpagelink/에서 확인할 수 있습니다.