Node.js, Express, and TypeScript를 사용하여 API 개발 세계로 뛰어들 준비가 되셨나요? Clean Architecture 및 좋은 프로그래밍 관행을 적용하여 고품질 웹 서비스를 만드는 방법을 알아보는 것이죠.
이 기사에서는 Node.js, Express, TypeScript를 사용하여 REST API를 개발하는 방법을 살펴볼 것입니다. 이 도구들은 JavaScript 개발 커뮤니티에서 널리 사용되며 웹 서비스를 만드는 데 강력한 기능 세트를 제공합니다. 대신에, Clean Architecture와 좋은 프로그래밍 관행을 적용하여 코드가 모듈식이고 확장 가능하며 장기적으로 유지 관리하기 쉬운지 확인하는 데 중점을 둘 것입니다.
우리는 다른 게시물에서 만든 프로젝트를 시작점으로 삼을 것입니다. 이 게시물에서는 Express 및 TypeScript를 사용하여 Node 프로젝트를 단계별로 만드는 방법에 대해 설명합니다:
이 저장소에서 초기 코드를 set-up-project 브랜치에서 찾을 수 있어요.
Clean Architecture
클린 아키텍처는 세 가지 주요 계층으로 구성되어 있어요:
- 도메인: 외부 기술과 독립적인 비즈니스 로직을 포함하고 있어요.
- 인프라스트럭처: 데이터베이스 및 외부 서비스와 같은 기술적 세부 사항을 처리해요.
- 프레젠테이션: 사용자와 상호작용하며 요청을 도메인 계층으로 전달해요.
프로젝트 기능마다 세 개의 레이어를 생성할 것입니다. 이번 개발에서는 TODO 목록에 대한 완전한 CRUD를 만들 것입니다. 다음은 우리의 디렉터리 구조의 초기 개요입니다.
node-template-server/
│
├── dist/
├── node_modules/
├── src/
│   ├── core/
│   │   ├── config/
│   │   ├── constants/
│   │   ├── errors/
│   │   └── types/
│   ├── features/
│   │   ├── shared/
│   │   │   ├── domain/
│   │   │   │   ├── dtos/
│   │   │   │   ├── entities/
│   │   │   └── presentation/
│   │   │       └── middlewares/
│   │   │
│   │   ├── todos/
│   │   │   ├── domain/
│   │   │   │   ├── datasources/
│   │   │   │   ├── dtos/
│   │   │   │   ├── entities/
│   │   │   │   ├── repositories/
│   │   │   │   └── usecases/
│   │   │   │
│   │   │   ├── infrastructure/
│   │   │   │   ├── local.datasource.impl.ts
│   │   │   │   └── repository.impl.ts
│   │   │   │
│   │   │   └── presentation/
│   │   │       ├── controller.ts
│   │   │       └── routes.ts
│   │   └── ...
│   ├── app.test.ts
│   ├── app.ts
│   ├── routes.ts
│   ├── server.ts
│   └── testServer.ts
├── .env
├── .env.template
├── .env.test
├── ...
├── package.json
└── ...
도메인 — 엔티티
엔티티는 어플리케이션 도메인의 기본 개념을 나타내는 객체입니다. 이 객체들은 시스템 내의 주요 요소의 핵심 상태와 동작을 캡슐화합니다. 이 경우, 다음 엔티티를 정의할 것입니다:
// src\features\todos\domain\entities\todo.entity.ts

import { AppError, ZERO } from '../../../../core';

export class TodoEntity {
 constructor(
  public id: number,
  public text: string,
  public isCompleted: boolean = false
 ) {}

 public static fromJson(obj: Record<string, unknown>): TodoEntity {
  const { id, text, isCompleted = false } = obj;
  if (!id) {
   throw AppError.badRequest('This entity requires an id', [{ constraint: 'id is required', fields: ['id'] }]);
  }
  if (!text || (text as string).length === ZERO) {
   throw AppError.badRequest('This entity requires a text', [{ constraint: 'text is required', fields: ['text'] }]);
  }
  return new TodoEntity(id as number, text as string, isCompleted as boolean);
 }
}
🚧 The implementation of the AppError class will be done later.
이 글에서는 TODO 목록을 위한 getAll() 메서드의 구현을 보여드리겠지만, 최종 코드에는 모든 메서드(create, update, delete, getById)의 구현이 포함되어 있습니다.
Domain — Repositories
저장소는 도메인 레이어와 인프라 레이어 사이의 인터페이스 역할을 하는 데이터 액세스 추상화입니다. 주요 목적은 데이터 저장 및 검색과 관련된 로직을 캡슐화하여, 도메인 레이어가 엔티티와 작동할 수 있도록 특정 데이터 저장 또는 검색 방법에 대해 걱정하지 않고 추상화 레이어를 제공하는 것입니다.
// src\features\todos\domain\repositories\respository.ts

import { type TodoEntity } from '../entities/todo.entity';

export abstract class TodoRepository {
 abstract getAll(): Promise<TodoEntity[]>;
 // rest of operations
 // ...
}
도메인 — 유스 케이스
유스 케이스는 응용 프로그램 내에서 사용자 또는 시스템이 수행할 수 있는 특정 작업 또는 기능을 나타냅니다. 이러한 유스 케이스는 인프라 및 구현 세부 정보와 독립적인 방식으로 비즈니스 로직을 캡슐화하여 다양한 컨텍스트에서 이식 가능하고 재사용 가능하게 만듭니다.
// src\features/todos/domain/usecases/getAll.usecase.ts

import { TodoEntity } from '../entities/todo.entity';
import { TodoRepository } from '../repositories/respository';

export interface GetTodosUseCase {
  execute: () => Promise<TodoEntity[]>;
}

export class GetTodos implements GetTodosUseCase {
  constructor(private readonly repository: TodoRepository) {}

  async execute(): Promise<TodoEntity[]> {
    return await this.repository.getAll();
  }
}
도메인 — 데이터 소스
데이터 소스는 응용 프로그램에서 필요한 데이터를 가져오는 데이터 소스를 나타내는 인터페이스나 개념을 의미합니다. 이러한 데이터 소스는 데이터베이스, 웹 서비스, 파일 시스템 또는 다른 형식의 데이터 저장소일 수 있습니다. 데이터 소스를 사용함으로써 비즈니스 로직을 데이터 소스의 구체적인 세부 정보와 분리할 수 있습니다. 즉, 도메인 레이어는 구체적인 구현 세부 정보를 알 필요 없이 일반적인 인터페이스를 통해 데이터 소스와 작업할 수 있습니다. 이는 응용 프로그램 로직에 영향을 미치지 않고 데이터 소스를 교환하거나 업데이트할 수 있도록 만들어줍니다.
// src/features/todos/domain/datasources/datasource.ts

import { TodoEntity } from '../entities/todo.entity';

export abstract class TodoDatasource {
  abstract getAll(): Promise<TodoEntity[]>;
  // rest of operations
  // ...
}
도메인 — DTOs
DTO(Data Transfer Objects)는 응용 프로그램의 다른 레이어 간에 데이터를 전송하는 데 사용되는 객체입니다. 특히 프레젠테이션 레이어와 도메인 또는 인프라 레이어 간에 데이터를 전송하는 데 사용됩니다. DTO는 관련된 데이터를 캡슐화하고 비즈니스 로직을 노출하지 않고 한 컨텍스트에서 다른 컨텍스트로 전송합니다. DTO의 주요 기능은 정보를 구조화되고 일관된 방식으로 표현하여 응용 프로그램을 통해 전송하는 것을 용이하게 하는 것입니다.
이 기사에서는 DTO를 생성하지 않겠지만 최종 코드에서는 페이지네이션을 처리하고 TODO를 만들고 업데이트하고 가져오는 등의 DTO를 찾을 수 있습니다.
인프라 — 리포지토리 구현
인프라스트럭처 레이어의 저장소 구현은 도메인 레이어의 저장소 인터페이스에 정의된 메서드의 구체적인 구현을 제공하는 역할을 합니다. 이 구현은 데이터베이스, 외부 서비스 또는 기타 데이터 지속성 메커니즘과 상호 작용하는 것을 담당합니다.
// src\features\todos\infraestructure\repository.impl.ts

import { type TodoDatasource } from '../domain/datasources/datasource';
import { type TodoEntity } from '../domain/entities/todo.entity';
import { type TodoRepository } from '../domain/repositories/respository';

export class TodoRepositoryImpl implements TodoRepository {
 constructor(private readonly datasource: TodoDatasource) {}

 async getAll(): Promise<TodoEntity[]> {
  return await this.datasource.getAll();
 }

 // 나머지 작업
 // ...
}
인프라스트럭처 — 데이터 소스 구현
인프라스트럭처 레이어의 데이터 소스 구현은 도메인 레이어의 데이터 소스 인터페이스에 정의된 메서드의 구체적인 구현을 제공하는 역할을 합니다. 이 구성요소는 데이터베이스, 웹 서비스 또는 기타 데이터 저장 매체와 직접 상호 작용하는 것을 담당합니다.
// src\features\todos\infraestructure\local.datasource.impl.ts

import { type TodoDatasource } from '../domain/datasources/datasource';
import { TodoEntity } from '../domain/entities/todo.entity';

const TODOS_MOCK = [
 {
  id: 1,
  text: 'First TODO...',
  isCompleted: false
 },
 {
  id: 2,
  text: 'Second TODO...',
  isCompleted: false
 }
];

export class TodoDatasourceImpl implements TodoDatasource {
 public async getAll(): Promise<TodoEntity[]> {
  const todos = TODOS_MOCK.map((todo): TodoEntity => TodoEntity.fromJson(todo));
  return todos;
 }

 // rest of operations
 // ...
}
In this example, I am fetching the list of Todos from memory. However, this is the correct place to interact with an external database. For instance, the following code snippet demonstrates the implementation of a data source that communicates with a database using Prisma:
// src\features\todos\infraestructure\postgres.datasource.impl.ts

import { type TodoDatasource } from '../domain/datasources/datasource';
import { TodoEntity } from '../domain/entities/todo.entity';

export class TodoDatasourceImpl implements TodoDatasource {
 public async getAll(): Promise<TodoEntity[]> {
  const todosFromDB = await prisma.todo.findMany();
  const todos = todosFromDB.map((todo): TodoEntity => TodoEntity.fromJson(todo));
  return todos;
 }

 // rest of operations
 // ...
}
Presentation— Controller
컨트롤러는 애플리케이션에서 클라이언트 요청의 진입점 역할을 하는 프리젠테이션 레이어 구성 요소입니다. 이러한 컨트롤러는 HTTP 요청을 수신하고 처리하여 도메인 레이어의 해당 비즈니스 로직으로 이동시키는 역할을 맡고 있습니다.
// src\features\todos\presentation\controller.ts

import { NextFunction, Request, Response } from 'express';

import { TodoRepository } from '../domain/repositories/repository';
import { TodoEntity } from '../domain/entities/todo.entity';
import { GetTodos } from '../domain/usecases/getAll.usecase';

export class TodoController {
  // 의존성 주입
  constructor(private readonly repository: TodoRepository) {}

  public getAll = (
    _req: Request<unknown, unknown, unknown, unknown>,
    res: Response<TodoEntity[]>,
    next: NextFunction
  ): void => {
    new GetTodos(this.repository)
      .execute()
      .then((result) => res.json(result))
      .catch((error) => {
        next(error);
      });
  };

  // 기타 작업
  // ...
}
프리젠테이션 — 라우트
라우트는 애플리케이션에 들어오는 HTTP 요청을 처리하고 라우트를 정의하는 역할을 맡은 프리젠테이션 레이어 구성 요소입니다. 이러한 라우트는 HTTP 요청을 해당 컨트롤러로 매핑하고 애플리케이션의 API 구조나 라우팅을 설정하는 데 사용됩니다. 데이터 소스 및 리포지토리를 초기화하는 곳이며, 컨트롤러에서 필요한 것과 동일합니다.
// src\features\todos\presentation\routes.ts

import { Router } from 'express';

import { TodoDatasourceImpl } from '../infraestructure/local.datasource.impl';
import { TodoRepositoryImpl } from '../infraestructure/repository.impl';
import { TodoController } from './controller';

export class TodoRoutes {
 static get routes(): Router {
  const router = Router();

  //* 이 데이터원은 변경할 수 있어요.
  const datasource = new TodoDatasourceImpl();
  const repository = new TodoRepositoryImpl(datasource);
  const controller = new TodoController(repository);

  router.get('/', controller.getAll);

  // 나머지 작업
  // ...

  return router;
 }
}
라우트
저희 애플리케이션에 전역 라우팅 파일을 생성할 것입니다. 여기서 저희는 애플리케이션의 모든 기능의 모든 경로를 라우트할 겁니다.
// src\routes.ts

import { Router } from 'express';

import { TodoRoutes } from './features/todos/presentation/routes';

export class AppRoutes {
 static get routes(): Router {
  const router = Router();

  router.use('/todos', TodoRoutes.routes);

  // 나머지 라우트들
  // ...

  return router;
 }
}
오류 처리
마지막으로, 서버에서 발생하는 오류를 처리하는 방법을 보여드리려고 합니다. 먼저 사용자 정의 오류에 대한 클래스를 생성하는 것부터 시작해보겠습니다:
// src\core\errors\custom.error.ts

import { HttpCode } from '../constants';

export interface ValidationType {
 fields: string[];
 constraint: string;
}

interface AppErrorArgs {
 name?: string;
 statusCode: HttpCode;
 message: string;
 isOperational?: boolean;
 validationErrors?: ValidationType[];
}

export class AppError extends Error {
 public readonly name: string;
 public readonly statusCode: HttpCode;
 public readonly isOperational: boolean = true;
 public readonly validationErrors?: ValidationType[];

 constructor(args: AppErrorArgs) {
  const { message, name, statusCode, isOperational, validationErrors } = args;
  super(message);
  Object.setPrototypeOf(this, new.target.prototype);
  this.name = name ?? 'Aplication Error';
  this.statusCode = statusCode;
  if (isOperational !== undefined) this.isOperational = isOperational;
  this.validationErrors = validationErrors;
  Error.captureStackTrace(this);
 }

 static badRequest(message: string, validationErrors?: ValidationType[]): AppError {
  return new AppError({ name: 'BadRequestError', message, statusCode: HttpCode.BAD_REQUEST, validationErrors });
 }

 static unauthorized(message: string): AppError {
  return new AppError({ name: 'UnauthorizedError', message, statusCode: HttpCode.UNAUTHORIZED });
 }

 static forbidden(message: string): AppError {
  return new AppError({ name: 'ForbiddenError', message, statusCode: HttpCode.FORBIDDEN });
 }

 static notFound(message: string): AppError {
  return new AppError({ name: 'NotFoundError', message, statusCode: HttpCode.NOT_FOUND });
 }

 static internalServer(message: string): AppError {
  return new AppError({ name: 'InternalServerError', message, statusCode: HttpCode.INTERNAL_SERVER_ERROR });
 }
}
이제 우리는 오류를 관리하는 미들웨어를 생성할 차례입니다. Express와 Node.js에서 미들웨어는 웹 애플리케이션의 요청 및 응답 객체에 액세스하는 함수로, HTTP 요청 처리 중간 작업을 수행하는 데 사용됩니다. 데이터 유효성 검사, 오류 처리, 사용자 인증 및 정보 등록과 같은 작업을 수행할 수 있습니다. Express 응용 프로그램에서 요청이 처리되고 응답이 생성되는 방식을 유연하게 제어할 수 있도록 합니다.
// src\features\shared\presentation\middlewares\error.middleware.ts

import { type Response, type NextFunction, type Request } from 'express';

import { HttpCode } from '../../../../core/constants';
import { AppError } from '../../../../core/errors/custom.error';

export class ErrorMiddleware {
 //* 의존성 주입
 // constructor() {}

 public static handleError = (error: unknown, _: Request, res: Response, next: NextFunction): void => {
  if (error instanceof AppError) {
   const { message, name, stack, validationErrors } = error;
   const statusCode = error.statusCode || HttpCode.INTERNAL_SERVER_ERROR;
   res.statusCode = statusCode;
   res.json({ name, message, validationErrors, stack });
  } else {
   const name = 'InternalServerError';
   const message = '내부 서버 오류가 발생했습니다';
   const statusCode = HttpCode.INTERNAL_SERVER_ERROR;
   res.statusCode = statusCode;
   res.json({ name, message });
  }
  next();
 };
}
이제 마지막으로 server.ts 파일을 수정하여 글로벌 라우터 및 에러 처리 미들웨어를 추가할 것입니다.
// src\server.ts

import { type Server as ServerHttp, type IncomingMessage, type ServerResponse } from 'http';
import express, { type Router, type Request, type Response, type NextFunction } from 'express';
import compression from 'compression';
import rateLimit from 'express-rate-limit';

import { HttpCode, ONE_HUNDRED, ONE_THOUSAND, SIXTY } from './core/constants';
import { ErrorMiddleware } from './features/shared/presentation/middlewares/error.middleware';
import { AppError } from './core/errors/custom.error';

interface ServerOptions {
 port: number;
 routes: Router;
 apiPrefix: string;
}

export class Server {
 public readonly app = express(); // 이것은 테스트 목적으로 공개되었습니다
 private serverListener?: ServerHttp<typeof IncomingMessage, typeof ServerResponse>;
 private readonly port: number;
 private readonly routes: Router;
 private readonly apiPrefix: string;

 constructor(options: ServerOptions) {
  const { port, routes, apiPrefix } = options;
  this.port = port;
  this.routes = routes;
  this.apiPrefix = apiPrefix;
 }

 async start(): Promise<void> {
  //* 미들웨어
  this.app.use(express.json()); // 요청 본문의 json 구문 분석 (raw 허용)
  this.app.use(express.urlencoded({ extended: true })); // x-www-form-urlencoded 허용
  this.app.use(compression());
  // 공개 API에 대한 반복된 요청 제한
  this.app.use(
   rateLimit({
    max: ONE_HUNDRED,
    windowMs: SIXTY * SIXTY * ONE_THOUSAND,
    message: '이 IP에서 너무 많은 요청이 있습니다. 1시간 후 다시 시도하세요'
   })
  );

  // CORS
  this.app.use((req, res, next) => {
   // 여기에 원본을 추가하세요
   const allowedOrigins = ['http://localhost:3000'];
   const origin = req.headers.origin;
   // eslint-disable-next-line @typescript-eslint/no-non-null-assertion
   if (allowedOrigins.includes(origin!)) {
    // eslint-disable-next-line @typescript-eslint/no-non-null-assertion
    res.setHeader('Access-Control-Allow-Origin', origin!);
   }
   res.setHeader('Access-Control-Allow-Methods', 'GET, POST, OPTIONS');
   res.setHeader('Access-Control-Allow-Headers', 'Content-Type');
   next();
  });

  //* 라우트
  this.app.use(this.apiPrefix, this.routes);

  // 테스트 REST API
  this.app.get('/', (_req: Request, res: Response) => {
   return res.status(HttpCode.OK).send({
    message: `Initial API에 오신 것을 환영합니다! \n http://localhost:${this.port}/에서 이용 가능한 엔드포인트`
   });
  });

  //* /api/v1/*에서 찾을 수 없는 라우트 처리 (오직 'Public content folder'가 없는 경우에만)
  this.routes.all('*', (req: Request, _: Response, next: NextFunction): void => {
   next(AppError.notFound(`${req.originalUrl}을(를) 이 서버에서 찾을 수 없습니다!`));
  });

  // 에러 처리 미들웨어 적용
  this.routes.use(ErrorMiddleware.handleError);

  this.serverListener = this.app.listen(this.port, () => {
   console.log(`${this.port}포트에서 서버 실행 중...`);
  });
 }

 close(): void {
  this.serverListener?.close();
 }
}
그리고 app.ts 파일에서:
// src\app.ts

import { envs } from './core/config/env';
import { AppRoutes } from './routes';
import { Server } from './server';

(() => {
 main();
})();

function main(): void {
 const server = new Server({
  routes: AppRoutes.routes,
  apiPrefix: envs.API_PREFIX,
  port: envs.PORT
 });
 void server.start();
}
또한, 우리는 테스트에서 서버를 사용할 수 있도록 파일을 생성할 것입니다. 이 테스트 서버는 jest와 supertest를 사용하여 엔드포인트에서 단위 테스트를 실행하는 데 도움이 될 것입니다.
// src/testServer.ts

import { envs } from './core';
import { AppRoutes } from './routes';
import { Server } from './server';

// 이는 테스트 목적으로 사용되는 테스트 서버입니다
export const testServer = new Server({
 port: envs.PORT,
 apiPrefix: envs.API_PREFIX,
 routes: AppRoutes.routes
});
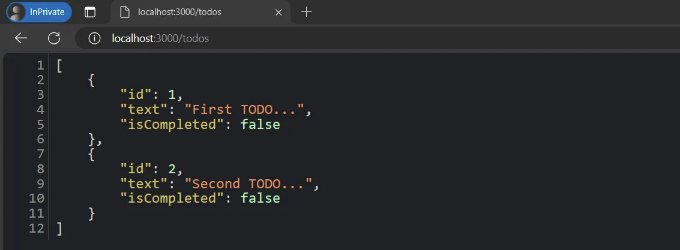
이제 우리의 어플리케이션을 실행할 수 있습니다
yarn dev
로컬 서버를 http://localhost:3000/todos에서 테스트할 수 있어요.
Node.js, Express 및 좋은 개발 관행과 Clean Architecture를 따른 REST API를 구현하면 현대적이고 확장 가능한 웹 애플리케이션을 개발하는 데 견고한 기반이 마련됩니다. 모듈화 접근 방식을 취하고 관심사 분리에 초점을 맞춤으로써 개발자는 유연성과 지속적인 시스템 진화를 장려하는 깨끗하고 유지보수 가능한 아키텍처를 구축할 수 있어요.
"Clean Architecture를 적용하면 응용 프로그램의 서로 다른 계층 간에 명확한 분리를 유지할 수 있습니다. 도메인 계층, 인프라스트럭처 계층, 그리고 프리젠테이션 계층과 같은 다양한 계층 간의 분리를 유지하면 코드를 시간이 지남에 따라 이해하고 유지하는 것이 더 쉬워집니다. 또한, 중간 작업을 위한 미들웨어 사용, 입력 데이터 유효성 검사, 적절한 오류 처리 등의 좋은 개발 관행을 채택하면 견고하고 안전한 API를 생성하는 데 기여합니다.
이 저장소가 유용했다고 생각하신다면 이 기사에 별표나 박수를 남겨주세요. 이 프로젝트의 소스 코드는 여기에서 찾을 수 있습니다.
이것과 다른 것들을 제 GitHub 저장소에서 찾아보세요. 내 웹사이트도 방문하지 않도록 잊지 마세요.
이 기사를 읽어주셔서 감사합니다!"
질문이 있으면 언제든지 물어봐 주세요. 제 메시지함은 항상 열려 있을 거예요. 질문이 있든, 안부를 물어보든, 성의를 다해서 답변해 드릴게요!